I have been cooking on a gas grill for years and, for a long time, my BBQ tasted like it. Perfectly cooked chicken, yes. Nice grill marks, sure. But that deep, smoky flavor I kept tasting at cookouts and local BBQ joints? Completely absent. I thought the only fix was buying a dedicated smoker, which felt like a big commitment for a guy with a full backyard and a Weber Spirit already taking up most of it.
Turns out the fix costs about forty dollars and fits in the palm of your hand. A smoker box placed directly on your gas grill burner produces genuine wood smoke that penetrates your food just like it would in a dedicated offset smoker. The Weber Premium Universal Stainless Steel Smoker Box is the one I use and recommend, and this guide walks you through the whole process from wood chip selection to final plating. By the end, you will know exactly how to get real smoke flavor out of the grill you already own.
If your gas-grilled meat tastes flat, this is the tool that fixes it.
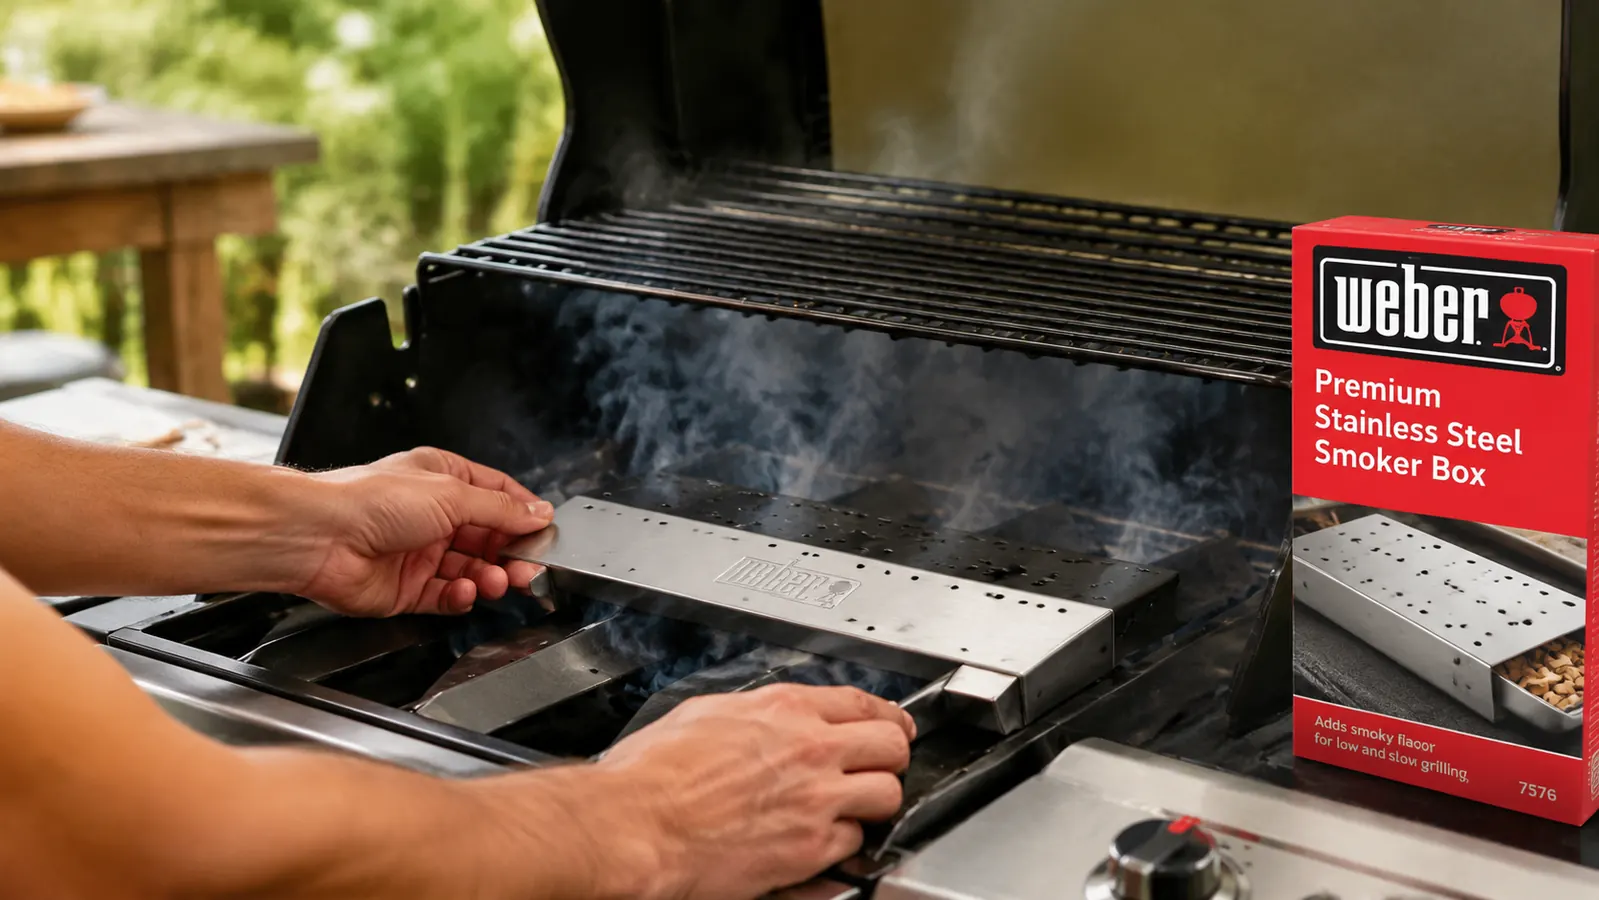
The Weber Premium Universal Stainless Steel Smoker Box sits right on your burner, holds a full cup of wood chips, and starts producing smoke within ten minutes. Rated 4.6 stars by over 3,800 backyard cooks.
Amazon Check Today's Price on Amazon →Step 1: Choose the Right Wood Chips for Your Protein
Before you fill the smoker box with anything, spend two minutes thinking about what you are cooking. Wood type is the single most direct way to influence smoke flavor, and mismatching it to your protein is the most common beginner mistake. Heavy woods like mesquite and hickory are assertive. They taste great on beef brisket, pork shoulder, and ribs. Used on delicate fish or chicken thighs, they can overwhelm everything else on the plate.
Milder fruit woods like apple, cherry, and peach are more forgiving and work beautifully on chicken, pork tenderloin, and salmon. Alder is the classic for fish. Oak sits in the middle, adding a clean smoky backbone without the punch of mesquite. A good rule of thumb: the darker the meat and the longer the cook, the bolder the wood can be. Quick cooks like chicken breasts and shrimp stay happier with apple or cherry.
For your first smoke on a gas grill, I recommend applewood chips with chicken thighs. Applewood is mild, slightly sweet, and almost impossible to over-smoke. It gives you a clear taste of what the smoker box is doing without the risk of the bitter, acrid edge that mesquite can produce when you are still dialing in timing. Once you run one successful cook and understand how the smoke behaves in your specific grill, you can start experimenting with bolder woods on bigger cuts.
Step 2: Prepare Your Wood Chips Correctly
This is where most tutorials send you in the wrong direction. Many guides tell you to soak your wood chips in water for thirty minutes before loading them. The logic sounds reasonable: wet chips smolder instead of burning, which produces more smoke. In practice, soaking mostly just delays the time before you get any smoke at all, and the steam produced in the early phase can actually water down the smoke flavor rather than intensify it.
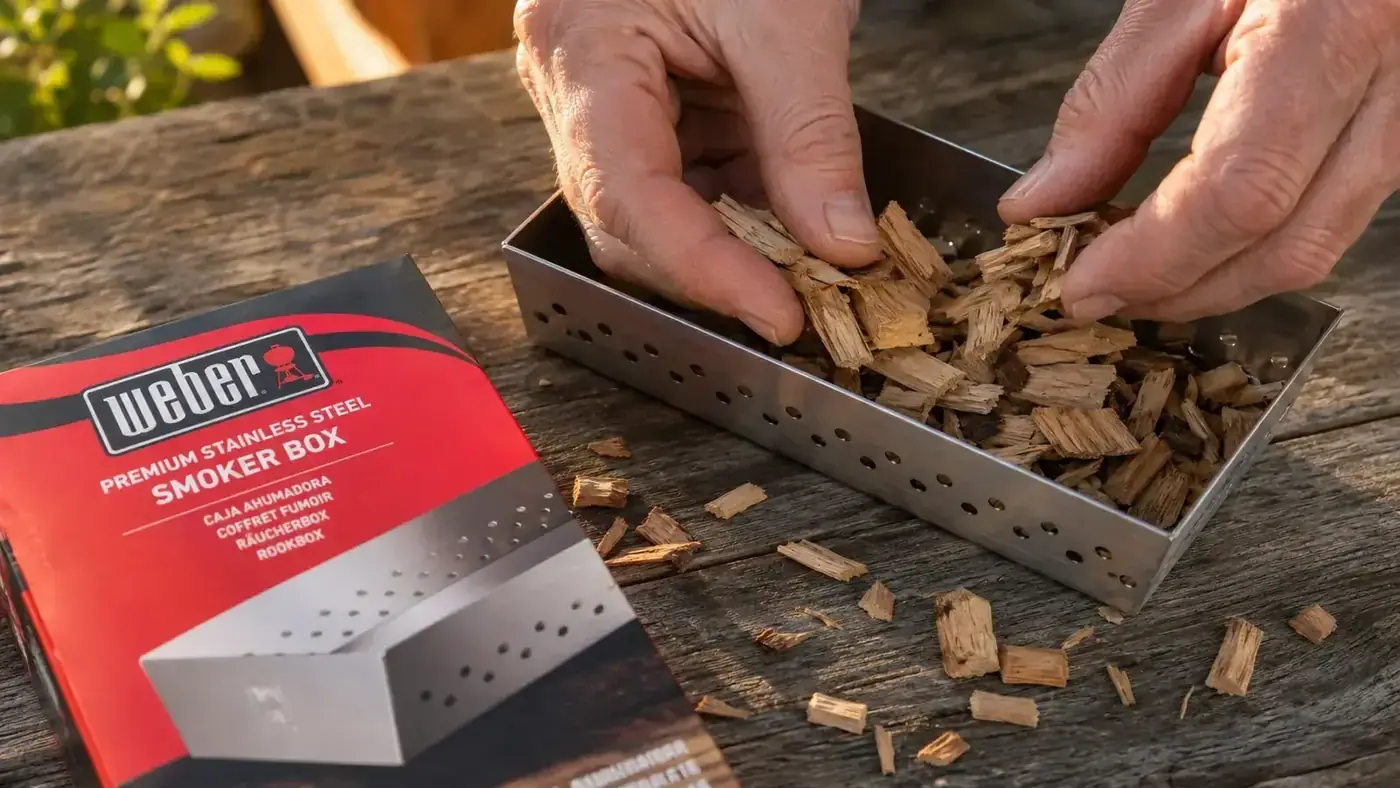
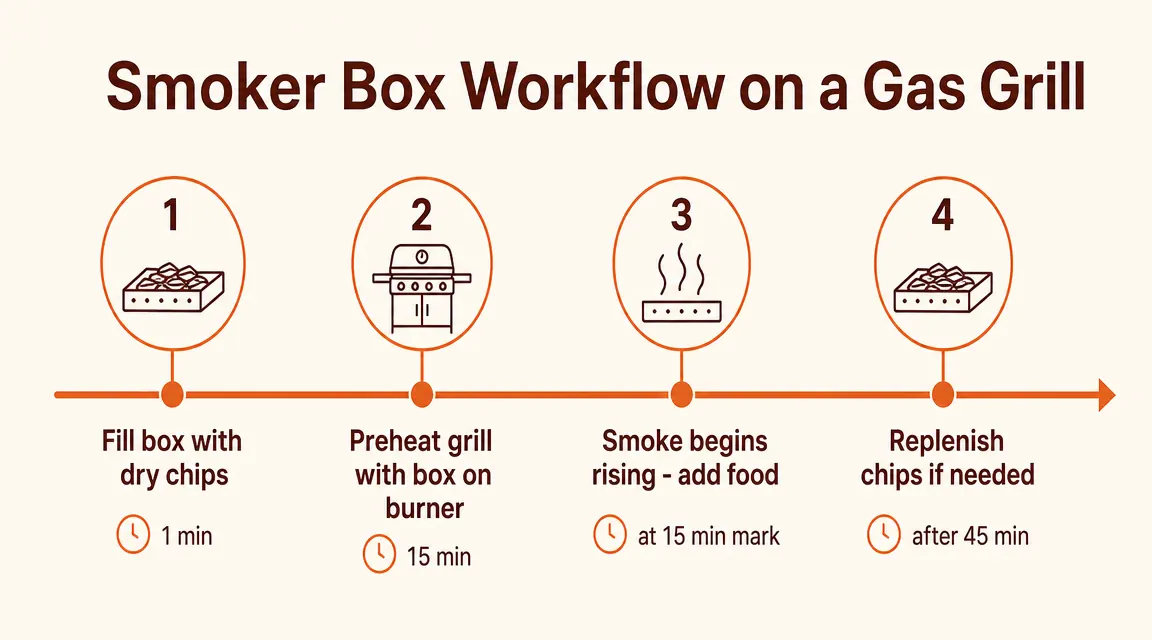
For a gas grill with a smoker box, use dry chips. The smoker box itself regulates the burn by limiting airflow through its small lid holes. Dry chips inside a Weber smoker box will start smoking within eight to twelve minutes and produce a steady, clean smoke for thirty to forty-five minutes. If you want a longer smoke session, simply refill the box once it stops producing visible smoke. Two fills of dry chips will easily carry a two-hour low-and-slow cook on a rack of spare ribs.
Fill the smoker box about two-thirds full. You do not need to pack it tight. Loose chips have more surface area exposed to heat, which actually improves combustion efficiency inside the box. One cup of chips is roughly right for most Weber smoker box fills. Keep the lid of the smoker box seated fully down so the airflow stays controlled from the start of the cook.
Step 3: Position the Smoker Box on Your Gas Grill
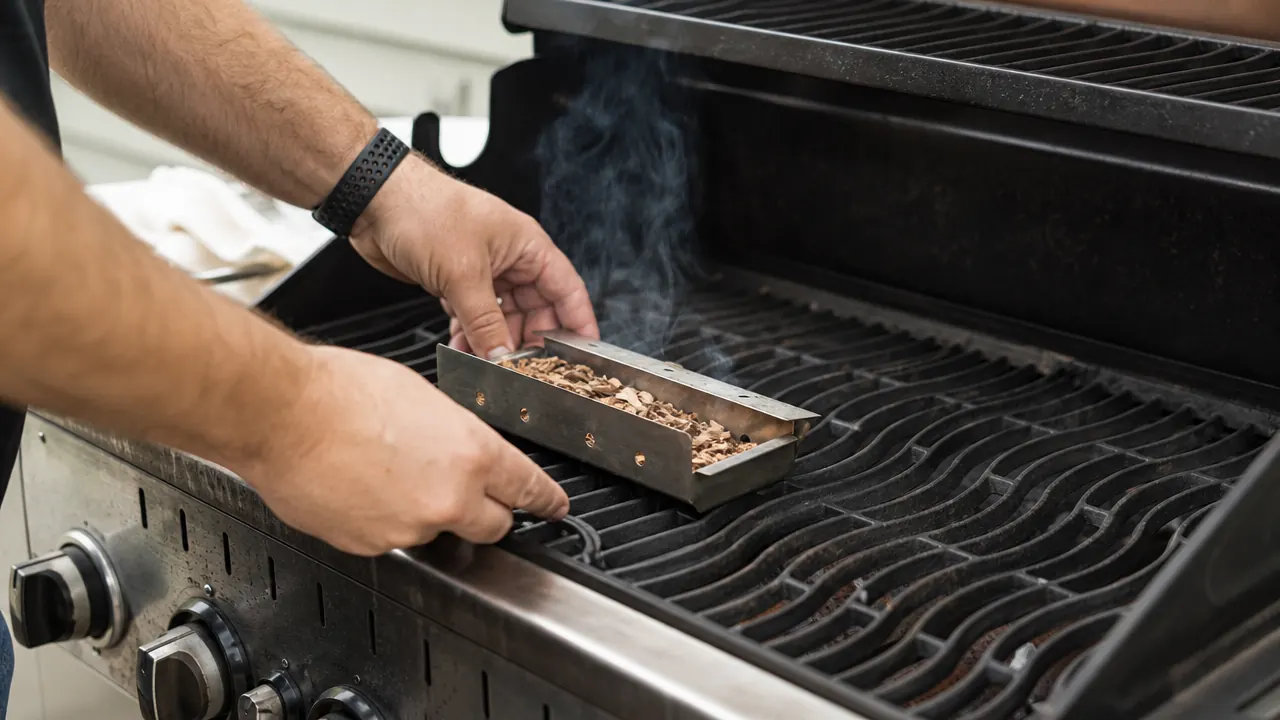
Placement matters more than most people realize. The smoker box needs direct, intense heat to produce smoke. On a gas grill, that means sitting directly on the burner cover or flavorizer bar, not on the cooking grate. Placing it on the grate puts it too far from the heat source, and you will end up waiting twenty minutes for smoke that arrives thin and inconsistent.
Lift your cooking grate to the side and set the Weber smoker box directly on top of the burner covers or flavorizer bars. It is designed to sit flat across them. Position it over the burner you plan to run on high, which is typically the burner farthest from where your food will cook. This allows you to run a two-zone setup: the side with the smoker box runs hot to produce smoke, while the other side runs at the temperature your food actually needs.
Once the box is positioned, replace the cooking grate on top. The box stays below the grate for the entire cook. You should be able to see a small gap between the grate and the box, which is normal. The lid of the smoker box has small perforations that let smoke rise up through the grate and around your food. On a three-burner grill, place the box over the left burner and cook your food over the center and right burners with those set to indirect heat.
Step 4: Set Your Temperature and Let the Smoke Establish
This step is where patience pays off. Turn the burner beneath your smoker box to high. Close the grill lid and wait. Do not open it to check. Heat needs to build inside the grill to a point where the chips in the smoker box reach ignition temperature, which is around 450 to 500 degrees Fahrenheit at the chip surface. With the box sitting directly on the burner cover, this happens quickly, typically within ten to twelve minutes.
Once you see smoke coming out of your grill vents, your smoke environment is established. Now you can dial the heat back to your cooking temperature. For chicken, that is usually around 375 degrees Fahrenheit measured at the grate. For ribs or pork shoulder going low and slow, you want 225 to 250 degrees Fahrenheit on the indirect side. The smoker box will continue producing smoke at lower grill temperatures because the burner directly beneath it is still running hot, independent of what the indirect side is doing.
A quick note on your grill thermometer: the built-in dial on most gas grills reads the temperature at lid level, not at grate level. Grate temperature can run 25 to 50 degrees Fahrenheit lower. If you are cooking chicken and the lid thermometer shows 400 degrees Fahrenheit, actual grate temperature is probably closer to 360 degrees Fahrenheit. An inexpensive grill-surface thermometer or an instant-read probe placed near the food gives you the accurate read you need to cook with confidence.
The moment my grill vents started pushing out that thin blue smoke, I honestly could not believe it was coming from a gas grill. My neighbor walked over to see what I was cooking.

Step 5: Cook Your Food with the Lid Closed
From here, the process is mostly about keeping the lid closed. Every time you open the grill, you release the smoke environment that you worked to build. Think of the closed lid as your smoke chamber. Food needs sustained contact with smoke-infused air to absorb flavor into the surface layer, and that only happens with the lid down.
For chicken thighs and breasts running around 375 degrees Fahrenheit, check temperature with a good meat thermometer after twenty-five minutes, not before. Chicken is done at 165 degrees Fahrenheit internal temperature. For ribs at 225 degrees Fahrenheit, plan on three to four hours and resist the urge to peek more than once an hour. Brisket at 225 degrees Fahrenheit can take eight to twelve hours depending on size, and you will need to refill the smoker box two or three times during that cook.
Pay attention to smoke color as the cook progresses. Thin blue smoke is what you want. It is almost transparent, with just a slight blue-gray tint, and it produces clean, complex flavor. White or gray smoke usually means the chips are burning too fast or the wood is wet. If you see white smoke, open the smoker box briefly, redistribute the chips with a skewer or tongs, replace the lid, and give it two or three minutes to settle back into a steady burn. Getting to blue smoke from white smoke typically takes less time than you expect.
What Else Helps
The smoker box handles the smoke side of the equation, but a few other details consistently separate good results from great ones. First, season your meat the night before if possible. A dry rub applied eight to twelve hours in advance lets the salt and spices work into the surface, which also opens the meat up to absorbing more smoke flavor during the cook. A simple rub of kosher salt, black pepper, garlic powder, and paprika does more than most store-bought rubs, and it costs almost nothing to mix.
Second, start with meat that is close to room temperature. Pulling cold chicken straight from the refrigerator and dropping it on a hot grill creates a temperature gradient that causes the outside to cook faster than the inside. Let your protein sit on the counter for twenty to thirty minutes before it goes on the grill. This small step consistently produces more evenly cooked results and helps the surface take on smoke more uniformly.
Third, rest your meat after it comes off the grill. This is especially important for larger cuts. A pork butt or a rack of ribs benefits from a ten to twenty minute rest loosely tented with foil before you cut into it. The juices redistribute during rest. Cutting immediately means those same juices run onto the cutting board instead of staying in the meat where they belong.
Finally, keep a spare bag of chips near the grill so refilling the smoker box is a thirty-second task rather than a trip to the garage. Having apple, hickory, and cherry on hand lets you match the wood to whatever you are cooking without planning ahead every time. After a few cooks you will develop a feel for which woods you reach for most, and you can stock accordingly.
You now have everything you need to try this on your next cookout.
The Weber Premium Universal Stainless Steel Smoker Box is the tool that makes this whole method work. It fits any gas grill, lasts for years, and costs less than a bag of charcoal. Over 3,800 reviewers give it 4.6 stars. Check the current price on Amazon before your next cook.
Amazon Check Today's Price on Amazon →